Creating a Conditional Starting Rule
Note: A workflow must be published before you can assign it a starting rule, and a workflow must have an enabled starting rule or be invoked by another workflow to be operational.
![]() See a video about creating a condition starting rule.
See a video about creating a condition starting rule.
To create a conditional starting rule
- You can create starting rules in the Rule Wizard, which you can access from the following locations:
- If you publish a workflow using the Publishing Wizard, you will be prompted to create a starting rule. Select the Create a starting rule after publishing checkbox in the Publishing Wizard, and click Next to use the Rule Wizard.
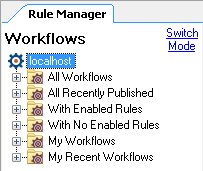
- In the Rule Manager Pane, select a
 workflow and click Add Starting Rule.
 - In the Rule Manager Search Pane, click Add Starting Rule, select a workflow, and click Create Rule.
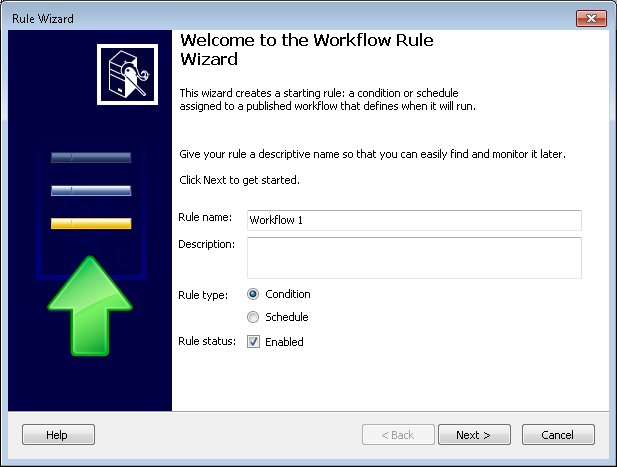
- In the opening screen of the Rule Wizard, name your rule and optionally add a description.
- Select Condition next to Rule type.
- Select the Enabled checkbox next to Rule status if you want your starting rule to be applied immediately. Clear the Enabled checkbox to enable the starting rule manually at a later point.
- Click Next.
- In the Starting Condition Properties dialog box, configure your starting rule's conditions.
- Use the Event Type drop-down menu to select what type of action will start the workflow.
- Optional: By default, the entry that satisfies the starting rule will become the starting entry used throughout the workflow. You can select Run workflow on at the bottom of the condition editor to run the workflow on a different entry than the one that satisfies the starting condition. Depending on what event type you chose, this option will allow you to run the workflow on the original entry's current folder, the original entry's original folder (if the event is Entry Moved), the original entry (if the event is Entry Copied), or the copied entry's current folder (if the event is Entry Copied). Show me an example.
- When defining starting rule conditions that specify metadata, folder paths, or users, you must specify a connection profile. Use the drop-down menu next to Get metadata from to select the condition profile that contains the templates, fields, and tags that you want to use to configure your starting rule.
- Configure one or more conditions. Click any underlined text in the condition editor to choose from a variety of condition options. You can create as many conditions as you want by clicking Add condition. Right-click a condition for more options. Learn more about configuring conditions.
- When you are done configuring your starting rule, click Publish. You will see a notification as to whether the publication succeeded.
- Click Finish. If you enabled your starting rule, your starting rule will be active in 30 seconds.
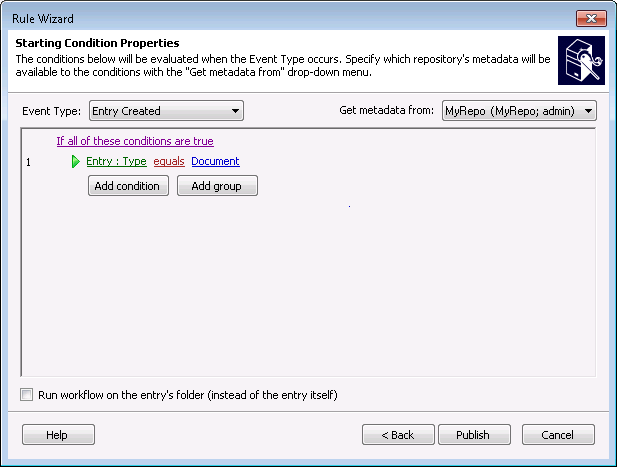

Tip: Workflow will run on any monitored repository in which the starting rule is satisfied. To specify which repository this starting rule should apply to, click the green Entry link, choose Repository, and specify a repository name.
Note: The Publish button will be disabled if your starting rule has invalid conditions. Invalid conditions have a red circle with a white exclamation mark  next to them. Click this icon to see a description of why your condition is invalid.